
A tiered access wristband workflow at door should connect each guest’s confirmed entitlement to the band staff apply and the spaces they can enter. For nightclub operators and event teams, that means clear answers about GA, VIP, table arrivals, re-entry, and upgrades. The door team needs a repeatable decision for each situation, plus a record that explains the bands used when the night is over.
What should each wristband tier actually authorize?
Each wristband should represent a defined access permission that staff can verify against the guest’s admission or booking record.
Write the permissions before choosing colors. General admission might cover the main floor. VIP might add a separate lounge. A table band might identify guests assigned to a booked section. Treat those as choices for your venue, rather than universal definitions.
Document boundaries that guests could reasonably misunderstand:
- Whether VIP includes every room or one designated area.
- Whether a table booking includes admission, and for how many guests.
- Whether a tier expires at a stated time.
- Whether backstage, staff, or service areas require separate authorization.
Keep queue priority separate from access permission. A priority entrance does not automatically grant access to another room.
Give each tier a readable label or other distinguishing mark alongside its color. Check samples under the lighting used at each checkpoint. If two bands look alike there, change the design before distribution.
Which line should get checked first?
Use a stated queue policy for GA, VIP, and table arrivals, while applying the same admission checks to every guest.
Decide what priority means in practice. A dedicated VIP lane and a shared entrance with alternating groups require different staffing. Staff should know whether table guests report to a host first or join a designated check-in lane.
The question of VIP versus GA priority belongs in the door briefing. Give one person authority to adjust the balance when a lane backs up.
A guest with an unresolved payment, missing reservation, or rejected ticket should move to an exception position. Keep that discussion outside the active scanning lane.
For a table party, the host can confirm the reservation while another employee continues processing ready guests. However, a host’s recognition of the lead guest should not replace checking the party allowance.
Mark the lane entrances clearly and tell hosts where to send guests whose booking covers several admission types.
Should the ticket scan happen before the wristband goes on?
Confirm admission and the correct tier before applying the wristband, then keep the guest within the controlled entry area until both steps are complete.
A practical sequence is:
- Complete the venue’s required identity and entry checks.
- Scan the ticket or locate the guest-list or booking record.
- Confirm the event, admission status, tier, and available guest allowance.
- Record the arrival and apply the matching band.
- Direct the guest to the permitted entrance or host.
Place banding beside the successful check-in position. Avoid a gap where a checked-in guest can leave without a band or someone else can enter the banding area.
If the record is marked as arrived but the band cannot be applied, log the interruption. The next employee needs to distinguish unfinished admission from an attempted second entry.
VenueStack’s check-in and scanning can support the admission step; keep band selection tied to the confirmed ticket or booking.
Use mobile ticket scanning practices to review device placement and staff handling before adding another checkpoint.
How should table guests be banded when they arrive separately?
Check in and band each table guest when they arrive, against the reservation’s remaining admission allowance.
A lead guest’s arrival should not mark the entire party present. That creates a false attendance record and leaves later staff guessing how many places remain.
Define how late arrivals identify the booking. The reservation name, booking reference, or an approved guest list can provide the starting point. Staff must still confirm that the person belongs to the party.
VenueStack’s table bookings and guest list management can provide booking context. Your door procedure should specify who approves additions and how those decisions are recorded.
Keep three questions separate: Is the table confirmed? Does the booking include this person’s admission? Has that person already arrived?
For guest list door management, assign an owner to name changes and party additions. A message from someone inside should reach that owner for approval.
Apply bands to arriving guests rather than handing the lead guest a bundle for the rest of the party.
Who should own scanning, wristbanding, and exceptions?
Assign a named owner to each task, with one supervisor responsible for decisions that change a guest’s entitlement.
At a small entrance, one employee may scan and apply bands. At a larger event, separate positions may handle verification, banding, and guest direction. In either layout, the handoff must make the approved tier clear.
Keep band stock within staff control. Separate unopened reserves from the supply currently in use, and record stock handed to another entrance.
The exception supervisor should handle disputed tiers, additional table guests, replacements, and upgrades. Staff need a visible way to reach that person without abandoning their station.
At shift changes, pass on:
- Current tier labels and access boundaries.
- Remaining band stock and replenishment location.
- Open guest disputes or unfinished admissions.
- Any approved change to access or re-entry rules.
Read the handoff back before the outgoing employee leaves. Keep the current tier sheet at every banding station.
What should happen when a guest leaves and returns?
Use a defined re-entry check that verifies the guest’s return permission and records their movement without creating another first admission.
An intact band may be part of that check, but decide whether staff also need the ticket, booking record, or a departure record. Make the requirement clear before the guest exits.
Separate temporary departures from final exits in your operating procedure. Guests stepping outside should know which exit to use, whether return is permitted, and whether a time limit applies.
If the check-in system supports a return status, train staff on its meaning. Otherwise, use a controlled departure and return log. Confirm how your actual setup handles a second scan before the event.
A returning VIP guest retains only the permissions attached to their tier. Re-entry should not become an informal upgrade.
Tell staff how to handle someone who returns through the wrong entrance. Route them to the designated check rather than accepting a band from across the queue.
How should staff handle a lost, loose, or damaged band?
Replace a band only after an authorized employee verifies the guest’s admission and records the reason for replacement.
For a damaged band still on the guest, inspect it and confirm the tier. Remove the old band before applying the replacement, and keep removed bands out of unused stock.
A missing band needs a different check. Locate the original admission record and establish that the person requesting replacement is the admitted guest. A ticket screenshot alone may leave that question unresolved.
Log the replacement time, tier, approving employee, and original identifier when one exists. With plain colored bands, recording a replacement does not remotely invalidate the missing band. Brief checkpoint staff on any resulting concern.
For someone who cannot wear the standard band, have the supervisor agree on an alternative that checkpoint staff can verify consistently.
Route unresolved requests to the supervisor rather than handing out a spare band to clear the line.
How should a mid-night upgrade change the wristband?
Approve and record the upgrade before exchanging the guest’s band for the new tier.
First confirm availability in the destination area. A guest’s willingness to pay does not establish that a table or VIP space is available.
Then check the original admission, the requested entitlement, any payment requirement, and who can authorize the change. Record the approval against the guest or booking using the records available to your team.
Exchange the old band at the upgrade position. Leaving both bands active on the guest can confuse staff about which permission applies. Keep removed bands separate from unused inventory.
For a group upgrade, process the people covered by the approval individually. Record whether absent party members are included and how they should claim their new access.
An upgrade changes entitlement; it does not create another person in attendance. Keep it separate from first admissions in the night’s records.
Tell the destination host which booking or guests were approved before sending the party across.
What happens when a scan fails or the connection drops?
Move uncertain admissions to a controlled exception process and issue bands only after staff establish a valid entitlement.
A failed scan can mean different things: an unreadable screen, the wrong event, an already-used ticket, or a device problem. Staff should identify the displayed result before trying again.
For an unreadable code, use an approved lookup method. For an already-used ticket, check whether the guest is returning or whether another person used the admission. Repeated scanning does not resolve that distinction.
Prepare an outage procedure based on capabilities you have confirmed in your setup. If multiple entrances cannot share current admission status, duplicate checking becomes harder.
A controlled manual log should capture the admission reference, guest or party identifier, time, entrance, tier, and approving employee. Assign one person to enter and reconcile those records when service returns.
Keep the records secure and collect only what staff need for admission. Hand the completed log to its owner before the entrance team disperses.
Can wristbands tell you how many people are inside?
Wristbands show access permissions, while live occupancy requires a separate count of people entering, leaving, and moving between controlled areas.
Issued bands remain on guests after they leave. Upgrades and replacements also consume stock without adding people. For those reasons, band usage cannot establish how many guests are currently inside.
Maintain a venue entrance count and a separate process for rooms where access is controlled. A VIP band can establish eligibility for a lounge, but the checkpoint still needs to know whether that room can accept another guest.
Keep returning guests and internal room transfers distinct from first admissions. Otherwise, the same person may inflate more than one count.
Build multi-room capacity tracking into checkpoint responsibilities. Specify who records movement and who can pause entry.
When the room count is uncertain, have the responsible supervisor resolve it before staff admit more guests. Give every checkpoint the same decision.
How do you reconcile wristbands with check-ins the next morning?
Reconcile unused stock, documented band usage, and guest admission records separately, then investigate the differences.
Start with stock movements for each tier:
Bands used = opening unused stock + stock received − closing unused stock − stock transferred out.
Count only unused bands as closing stock. Removed bands from upgrades or replacements should stay outside that count.
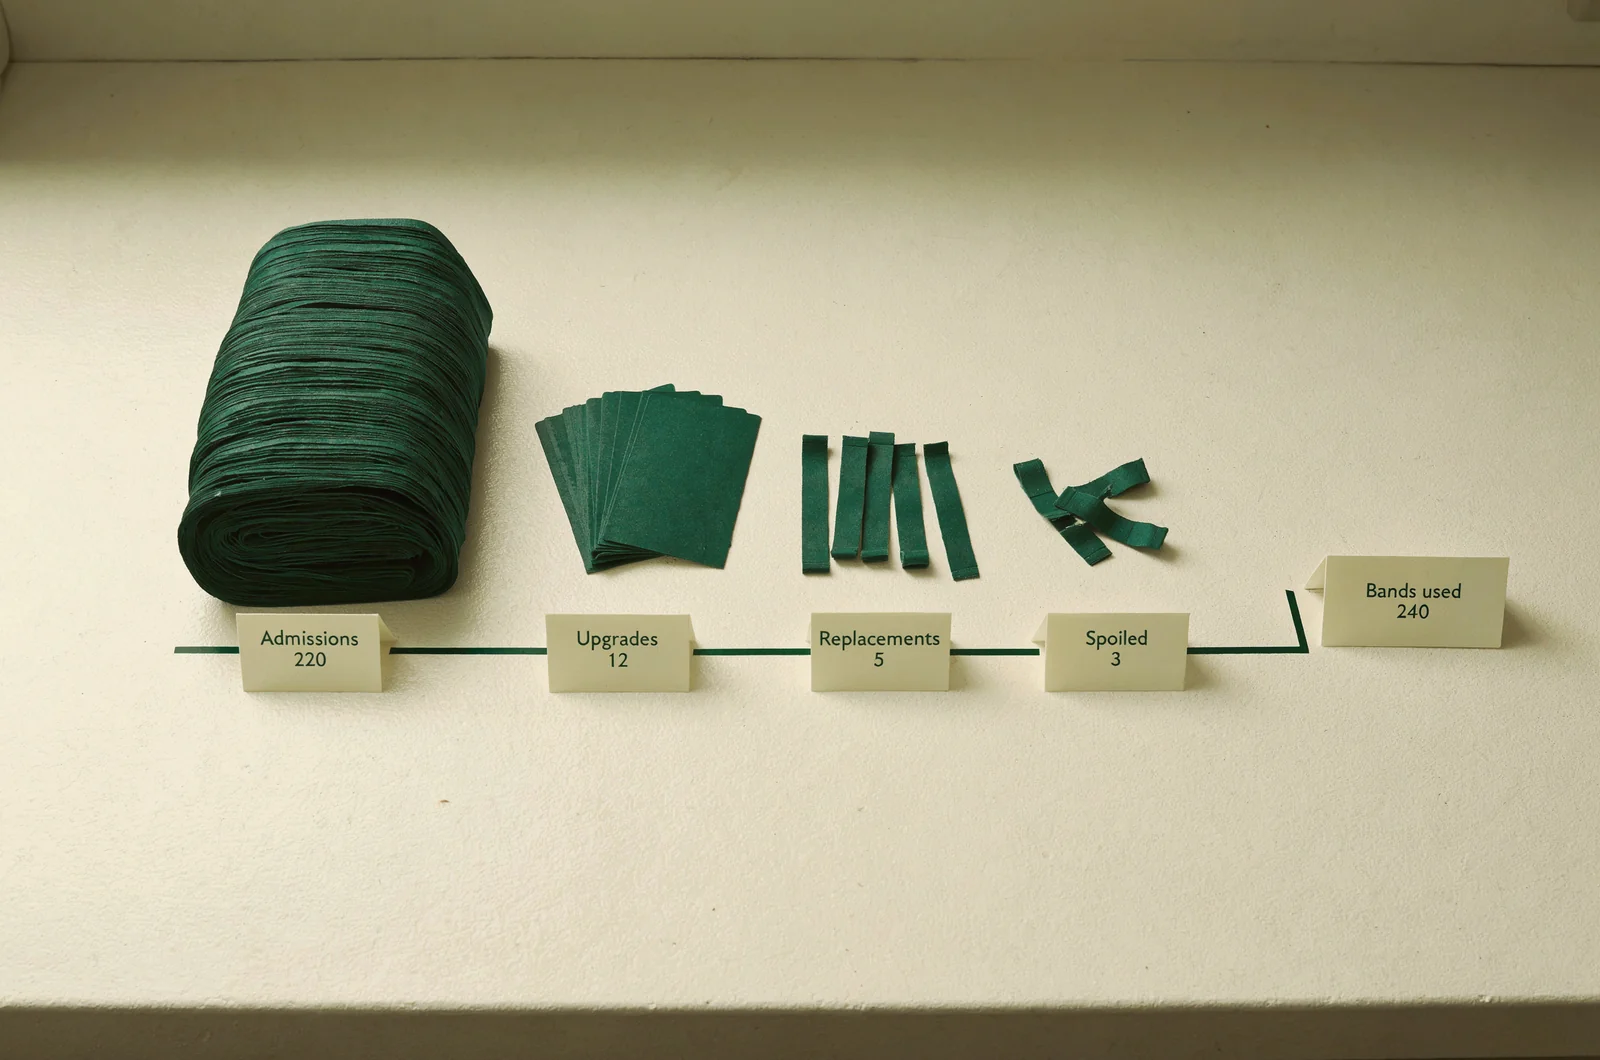
Break usage into first admission bands, upgrade bands, replacement bands, and spoiled unused bands. The categories explain why bands consumed may exceed guests admitted.
For an illustrative night, suppose staff use 240 bands: 220 for first admissions, 12 for upgrades, five for replacements, and three spoiled before application. If every first-time guest receives one band, 220 unique admissions would match that record.
VenueStack’s event reporting can provide sales and attendance context for the review. Check what each report measures before comparing it with physical stock.
Use the morning-after review to investigate unexplained usage, unrecorded admissions, and differences between entrances.
Assign each discrepancy to an owner. Record the correction or explanation against the relevant event before closing the review.
What should the team rehearse before doors open?
Rehearse the exceptions that require a judgment call, alongside one ordinary arrival from each tier.
Have staff explain what they would check for a GA guest requesting VIP access, a late table guest, an already-used ticket, and a damaged band. Include an upgrade when the destination area has no availability.
Use the actual devices, band samples, lighting, and station layout. That rehearsal should expose an unclear handoff before guests reach it.
A simple interactive selector could help supervisors train staff. Let users choose the guest’s tier, arrival status, and problem, then display the required checks and approving role. Treat it as a procedure aid rather than proof of admission.
Finish by confirming who owns unresolved cases and where those guests should wait. Place the current tier sheet, exception log, and supervisor contact details at each entrance.